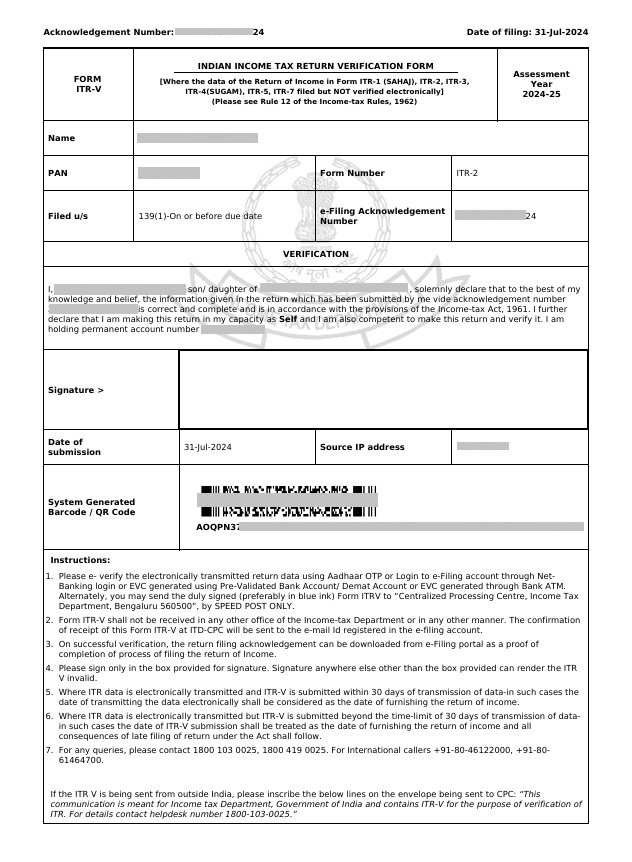
Form ITR-V stands for ‘Income Tax Return-Verification’ Form. This document is generated when an Income Tax Return (ITR) is filed online without a x`digital signature. The ITR-V serves as an acknowledgment from the Income Tax Department and is essential to complete the e-filing process. Typically, the Income Tax Department sends the ITR-V via email, but taxpayers can also download it directly from the income tax e-filing website.
Importance of ITR Verification
Verifying your ITR is a crucial step in the income tax filing process. You can do this either by physically sending a signed copy of the ITR-V to the Centralized Processing Center (CPC) in Bangalore or by using one of the online e-verification methods. File your ITR with us.
Steps to Download ITR-V Acknowledgment
Here’s how you can easily download your ITR-V from the official website:
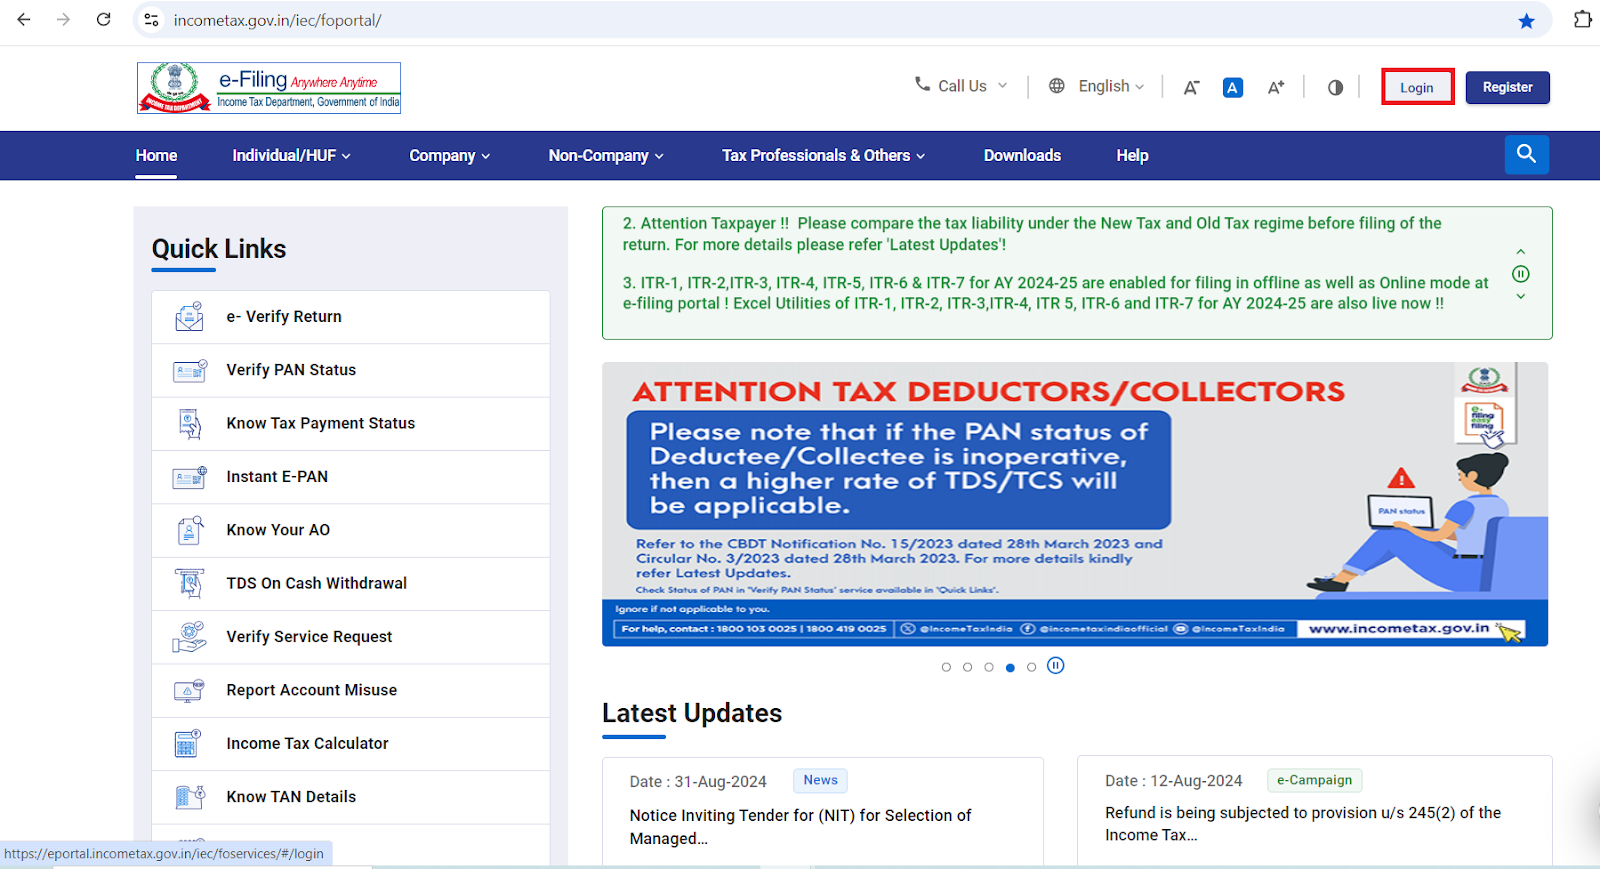
- Visit the Income Tax India Website: Go to www.incometax.gov.in and log in using your credentials.
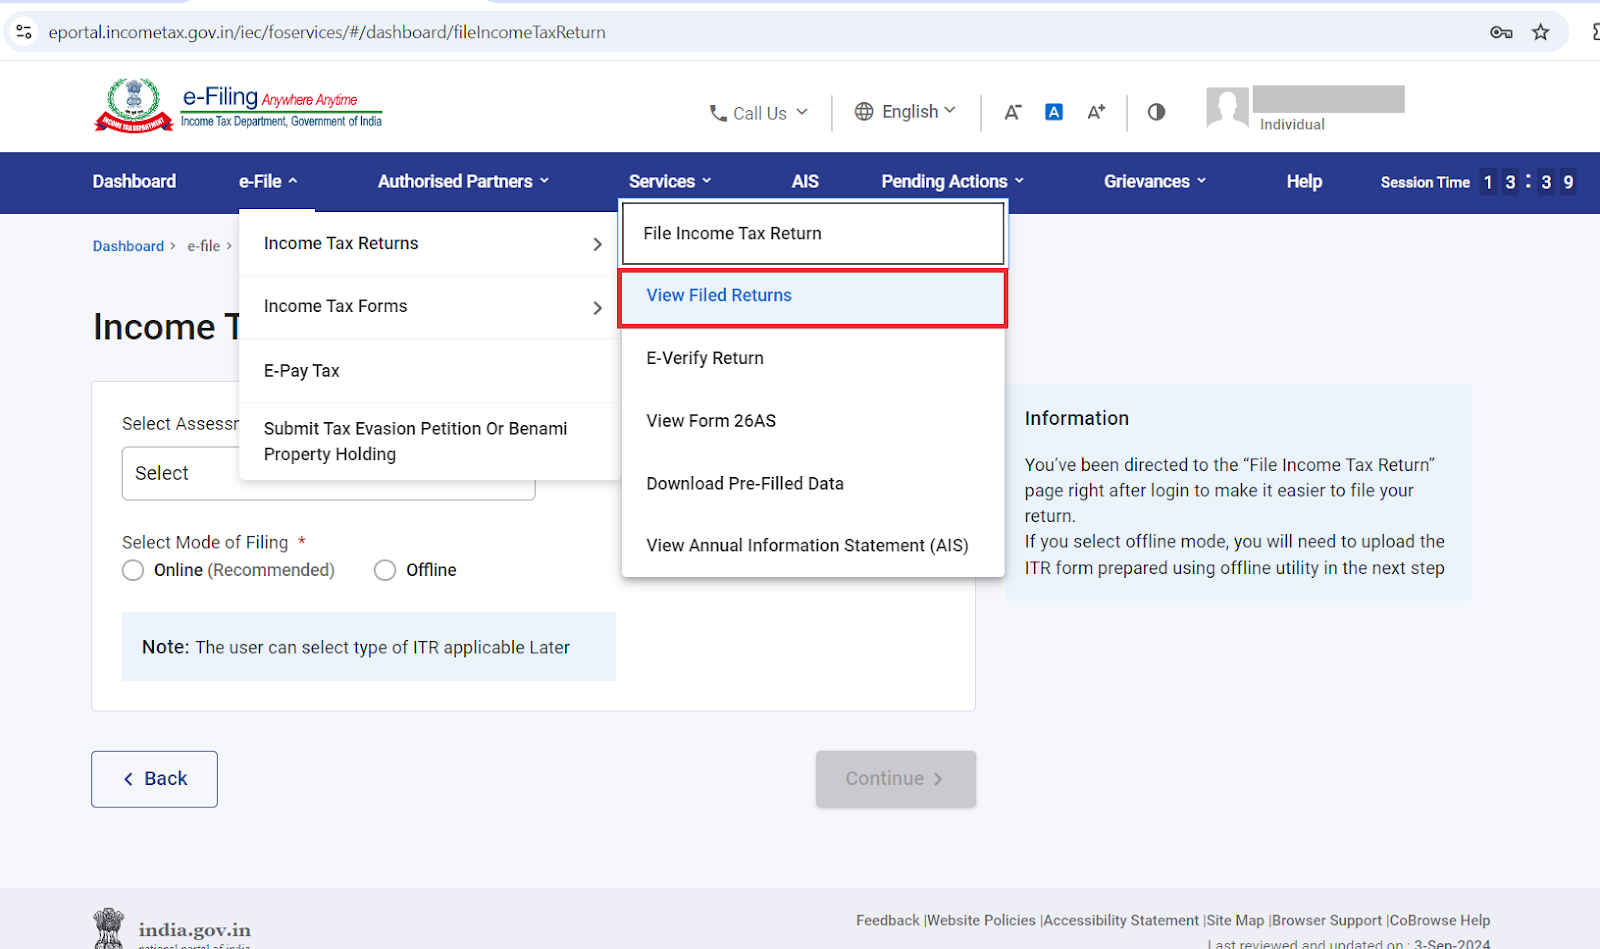
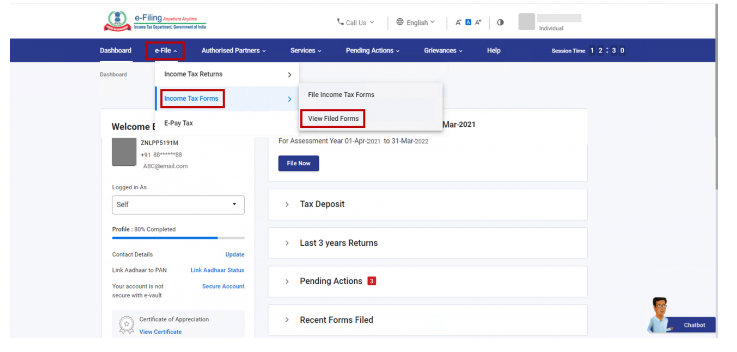
2. Access Your Filed Returns: After logging in, navigate to ‘e-File’ > ‘Income Tax Returns’ > ‘View Filed Returns’ to view your e-filed tax returns.
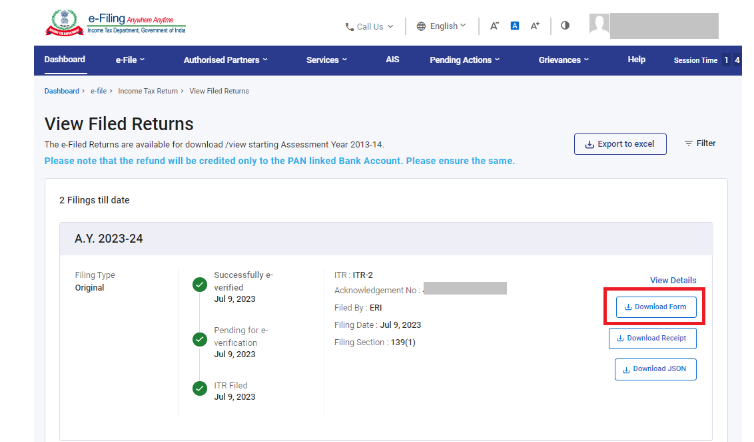
3. Download the ITR-V: For the relevant assessment year, click on the ‘Download Form’ button to download the ITR-V acknowledgment form.
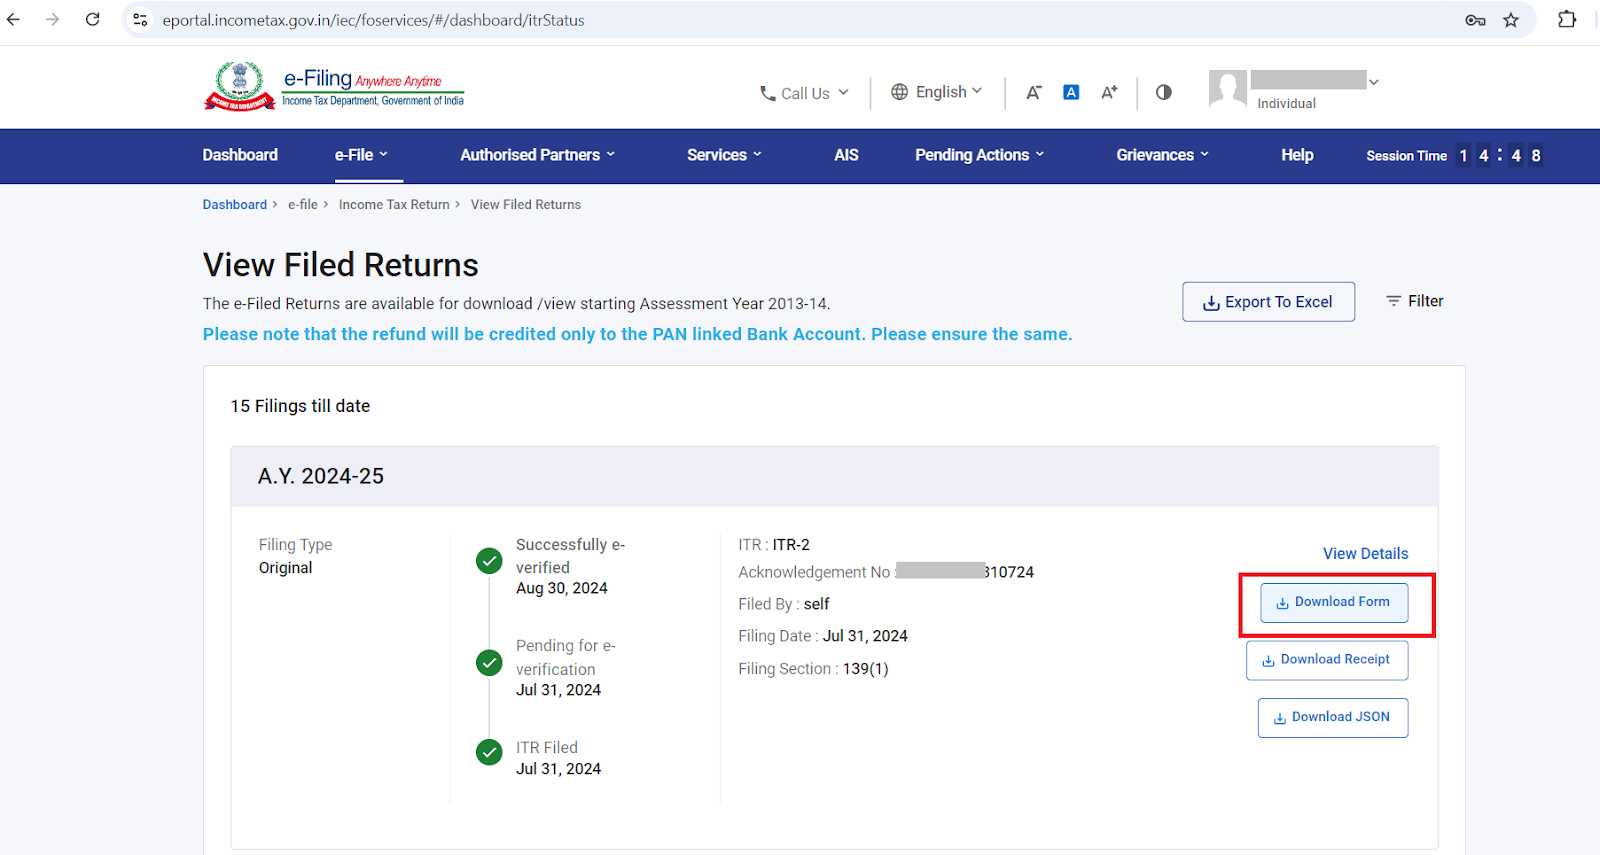
The acknowledgement form will be downloaded. Here’s how the ITR-V form looks like if you are not e-verified your ITR:
Methods to E-verify Your Income Tax Return
There are several ways to e-verify your ITR, making the process quick and convenient:
- Aadhaar-based OTP: Choose the option to verify using an OTP sent to your Aadhaar-registered mobile number. After confirming your Aadhaar details, you’ll receive a 6-digit OTP via SMS, which you can use to e-verify your return.
- Net Banking: Select the ‘Via Net Banking’ option. Choose your bank, log in to your net banking account, and follow the prompts to complete the e-verification process directly from your bank’s portal.
- Bank Account: If you have a pre-validated bank account, you can generate an Electronic Verification Code (EVC) through it. The EVC will be sent to your registered mobile number and email address, which you can then use to e-verify your ITR.
- Demat Account: Similar to the bank account method, you can generate an EVC through a pre-validated Demat account. The EVC will be sent to your registered contact details for e-verification.
- Bank ATM: Some banks offer the option to generate an EVC through an ATM. Swipe your card at the ATM, select ‘Create EVC for Income Tax Filing,’ and the EVC will be sent to your registered mobile number and email address.
Manual Submission of ITR-V to CPC Bangalore
If you choose to manually verify your ITR, print the ITR-V form you received via email or downloaded from the portal. Sign the form in blue ink, place it in an A4 envelope, and mail it to the CPC in Bangalore within 30 days of filing your ITR. Make sure to use regular post as courier services are not accepted. The mailing address is:
Income Tax Department – CPC
Post Box No.1,
Electronic City Post Office,
Bangalore-560500, Karnataka.
How to Download Previous Years’ ITR
If you need to download ITRs from previous years, follow these steps:
- Log in to the E-filing Portal: Use your login credentials to access the portal.
- View Filed Returns: Navigate to ‘e-file’ > ‘Income Tax Returns’ > ‘View Filed Returns.’
3. Download the ITR: Select the relevant assessment year and click ‘Download Form’ to get the ITR, which includes details like processing status, any outstanding demand, or refund information.
FAQ’s
Q1: What is the deadline for submitting the ITR-V for verification?
The ITR-V must be submitted or e-verified within 30 days of filing the tax return. Previously, the deadline was 90 days.
Q2: Can I verify my income tax return without submitting Form ITR-V?
Yes, you can verify your income tax return without submitting Form ITR-V. This can be done electronically using options like your Aadhaar card, PAN card, registered mobile number, or email ID.
Q3: What is the ITR-V acknowledgment form?
The ITR-V acknowledgment form is issued by the Income Tax Department when you file your tax return online without a digital signature. This document serves as a confirmation of your filed return, which must be verified either electronically or by sending the signed form to the Central Processing Centre (CPC) in Bangalore.
Q4: How do I download my ITR-V acknowledgment form?
To download your ITR-V, log in to the Income Tax e-filing portal, go to ‘e-File’ > ‘Income Tax Returns’ > ‘View Filed Returns’, and select the relevant assessment year. Then click on ‘Download Form’ to get your ITR-V.
Q5: What happens if I don’t verify my ITR within the given time frame?
If you fail to verify your ITR within the 30-day window, your tax return will be considered invalid. This means you’ll need to file your return again, which could lead to penalties or interest on any outstanding tax liability.
Q6: Can I submit ITR-V through a courier service?
No, ITR-V cannot be submitted through a courier service. If you choose to send the physical form, it must be sent via regular post to the CPC in Bangalore.
Q7: What are the different methods to e-verify my ITR?
You can e-verify your ITR using several methods, including Aadhaar-based OTP, net banking, bank account EVC, Demat account EVC, or generating an EVC through a bank ATM.
Q8: Is it necessary to send any other documents along with the ITR-V to CPC Bangalore?
No, you only need to send the signed ITR-V form. No additional documents are required.
Q9: How can I check the status of my ITR-V submission?
After sending your ITR-V, you can check the status on the Income Tax e-filing portal under the ‘My Account’ section by selecting ‘E-Verify Return’ or ‘View Filed Returns.’
Q10: Can I download previous years’ ITR-V forms?
Yes, you can download previous years’ ITR-V forms by logging into the Income Tax e-filing portal, navigating to ‘e-File’ > ‘Income Tax Returns’ > ‘View Filed Returns’, and selecting the desired assessment year.